Bring Nature Home- Sue's Sunny Garden
by Sue Van Baerle
For Parts 1 and 2, please see previous blog entries
Part 3- Planning, Design, Maps And Plants
Click for Part 4- May Maps and Tips
Click for Part 5- June Prep & Planting
Click for Part 6- Summer Recap and Fall Plan
Create a Top-Down Map: You do not need to create a map of your yard to make decisions about your new garden. However, a map might help you create a plan. For example, you might want to add one hundred square feet of native plants every year for the next few years. Before you plant your first year, you want to have an idea of the overall direction you are headed. Having a top-down plan will help you visualize how your garden will look in several years. You can plan how traffic will flow around the yard or map the mature size of trees to plan for sun and shade areas in years to come.
Most landscape plans you see are created by professionals to communicate and sell their ideas to the client. They can be very detailed and beautifully executed. Since you don’t need to communicate with or sell to anyone, you may be fine without one or with a simple design plan. A more accurate map of the planting area may help you think about where to place various species and calculate how many of each you want. You don’t need perfect drawings, computer drawings or beautiful colors but you probably want the relative sizes to be close to accurate.
For years, I went without a plan. I kept expanding the garden but after four or five years I had to tear out edging and paths because the overall garden wasn’t expanding in a coherent fashion. If I had created an overall plan before I started, I could have saved myself hours of labor. Then again, when I started, I had no idea how big my garden would become.
In the past I have used simple sketches to design; moving forward, I will use my new maps to design and record ideas. For example, one idea involves seeing my little bluestem backlit in the fall. I mark on the map where the sun sets in October and where I would need to plant little bluestem to see them backlit from our chairs. I might make note of how many plants I want but I do not map the exact location of each plant. The following spring, I know how many plants to purchase, and I have a good idea where to plant.
Overview - Creating Your Top-Down Map: To create the top down map you will create a rough sketch of the points you need; make a point list; go outside and take measurements; and then transfer the point list measurements to graph paper. You can photocopy the final map and try out new designs on the photocopy or you can use tracing paper to design on top of the map. If you design on your original map, you will have to redraw the map every time you sketch a design.
Rough Sketch (not to scale) Points Labeled: Create a rough sketch of the existing features you need to measure. You can create a sketch of just your new garden area, or you could include a large part of the yard around your new garden. The upside of a smaller area is there are fewer points to locate and draw on graph paper; the downside is you may forget about something that could impact the design. For example, the water from the downspout on your house or the shade from a neighbor’s tree. The upside of including a larger area is that you will have a reminder of how other features impact / interact with your new garden; the downside of a larger area, the longer it takes to collect the measurements and transfer them to graph paper. Just ask yourself how much information you need and how much time you have.
Your preliminary sketch will not be to scale. Label the points you want to locate and create a list of those points. When you go outside and measure the distances, you will use your point list to record the distances. In this simple example, I labeled the corners of the house, House1 and House2; the corners of the porch, Porch1 and Porch 2; etc. My point list leaves space for me to calculate and record the X, Y coordinates for each point. You can opt for fewer points at first and go back and get more points if you need them.
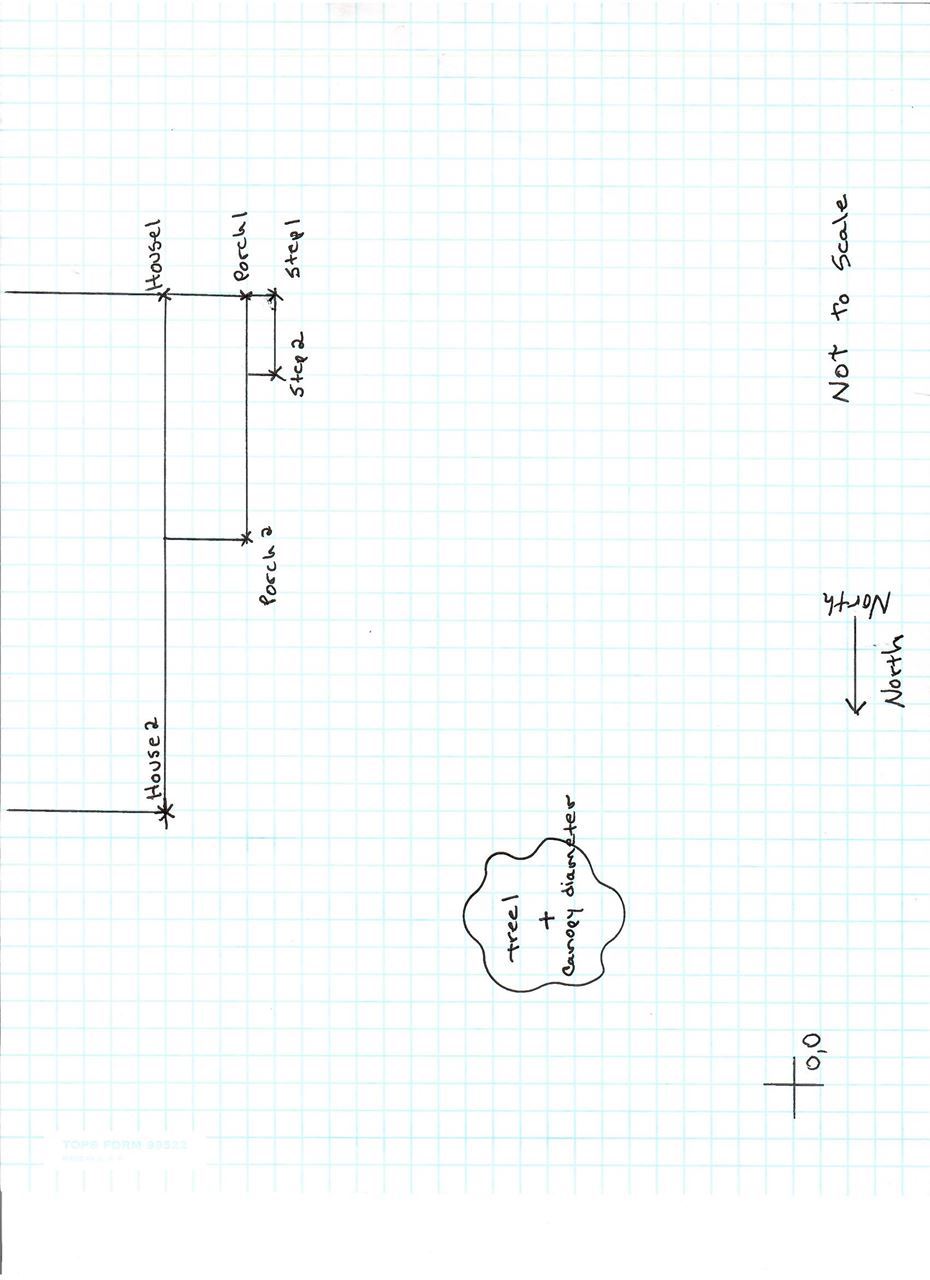

Measuring Your Physical Space: First, a short reminder about high school geometry. To create a top-down map with all positive values, you will put the 0 value for x (horizontal axis of your drawing) and the 0 value for y (vertical axis) in the lower left-hand corner of your graph paper. Then all the numbers for both X and Y will be positive. Knowing that you want 0,0 near the lower left-hand corner of your graph paper; go outside and place a stake / flag (or other marker) in the ground at the point that will be the physical 0,0 of your yard. Most often maps have North at the top of the page but it doesn’t have to be North. For example, I draw my map as if I am looking at the property from the street. In my case, East is to the top of the paper. Be sure to label the compass directions; it will help you remember where the shadow from a house or tree will be located.
It helps to have two people when you measure the area. One person can hold the end of the tape measure and the other can pull the tape measure and write the distances on your point list. The longer the tape measure, the quicker it is to measure. Don’t forget that your yard may not be square and your house might not sit square to the street. You can get a general overview of the property lines on zillow.com and more accurate property information from county records (web search for your county "property map.")
Graphing: If you measure the X and Y distances from 0,0 to point House2 and then from point House2 to point House1, you will have to do some addition to figure out the X,Y coordinates of House1. After you take all your measurements, calculate the largest final X and largest Y distance you want on your map. You will use the largest distances to determine if your graph paper will have Landscape (X is larger) orientation or Portrait (Y is larger) orientation. On the graph paper, count the number of squares you have available from the 0,0 point in the lower left corner to upper right corner of your drawing area. Based on the real-world distance and the number of graph paper squares you have available, you can decide the scale of each square. For example, each square might represents one foot or each square might represents 5 feet. Then plot your points on the graph paper and connect with lines to create the House, Porch etc. DON’T draw your new design on the graph paper. Put a piece of tracing paper over your graph paper and sketch your new design or photocopy your original map and draw on the photocopy. This way you can easily get back to your original map.
Designing The Shape: After you make a few sketches, look at both the positive and negative shape. Do you like the shape of the garden and do you like the shape of the area (perhaps lawn) that is not the garden. You want the lawn area to be easy to mow so check that there are no areas that are too small or curves that are too sharp for a mower. You can try shapes based on rectangles, circles, curves or combinations.
There are usually community rules about the height of your lawn grass. If you plant a meadow without borders, it might be mistaken for an unkept lawn. The plants could fall over a sidewalk, street or into your neighbor’s yard. If you make the shape of your new garden intentional, you will be less likely to have problems with neighbors thinking you have an unkept lawn. You will want to check with your community for the exact rules in your area. A few communities have updated their rules to allow for more native meadow style plantings.
 Garden Size: This information is for a city or suburban style planting, a large meadow or prairie style planting is maintained with mowing and sometimes fire. For a smaller garden, you will want to be able to reach into your garden to weed, water or replant. You can do that from the sidewalk, lawn, driveway, and paths or you can wander in as you would a large prairie. Generally speaking in a city or suburban yard, a bed that is less than three feet deep feels narrow, and a 16’ deep bed is hard to maintain without stepping on plants. Some people keep their beds smaller so that they don’t have to step into them to reach the majority of the plants. Traditional gardeners often recommend a bed that is 7 to 8 feet deep.
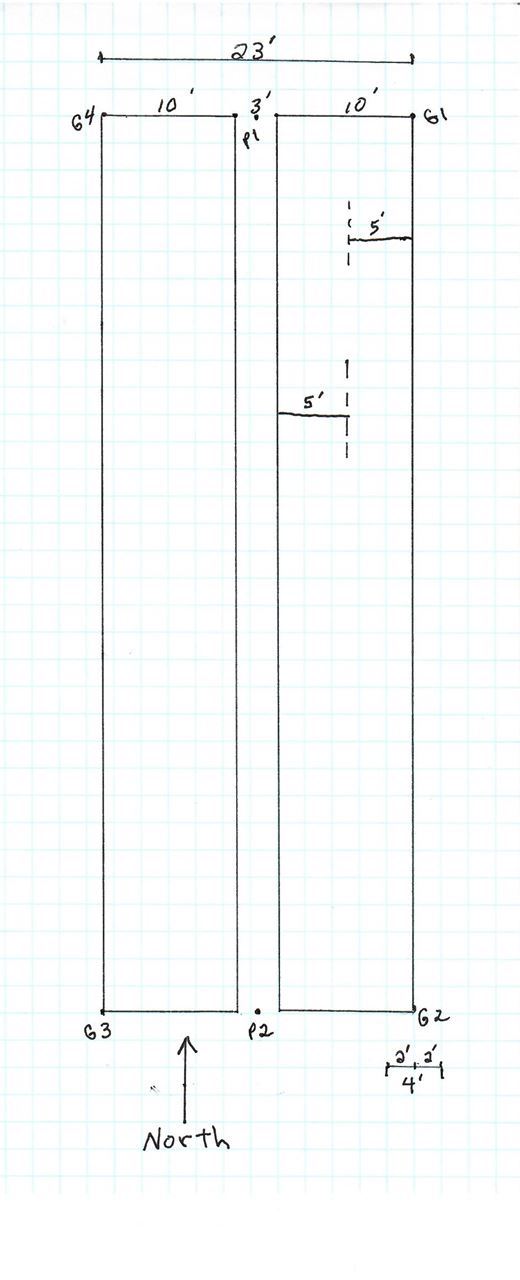
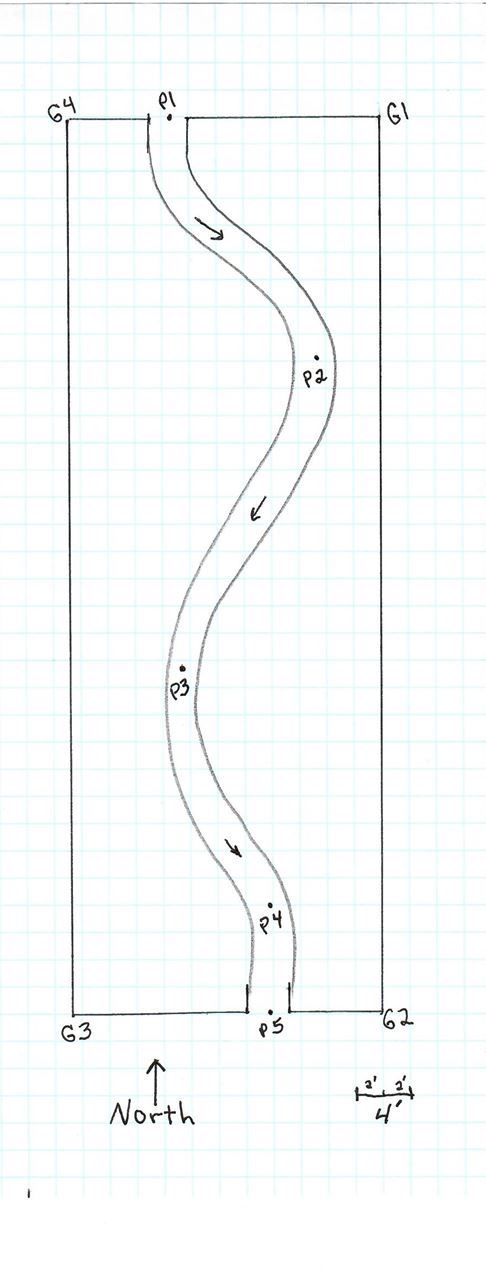
Path Design: One of the great things about mulched paths is that they dry out early and you don’t have to worry about stepping on plants or compacting soil. Paths most often start at a right angle to the garden bed line. If I run a 3’ wide path down the center of a 23’ wide bed that is surrounded by lawn, I divide the garden into a path and two beds that are each 10’ wide. I can take one step off the path or one step off the lawn and reach about 5’ or to the center of the 10’ wide bed. Of course, I want my path to be a bit more interesting. First it encourages me to look this way, then curve and view the garden from another direction, then maybe curve around to reveal a focal point. I don’t want the path to be so curved that I can’t move a wheelbarrow along it or so unpredictable that I have to focus on where I am stepping.
Sue’s Garden: This month one of my first chores will be finishing a more accurate map of the two new garden areas; one on each side of the front yard. I am confident in the width of the two new gardens because the width is a refinement of the area that I planted the past two years. I may eventually change how close to the street I want to plant. I acknowledge that I will have to change the paths if I change the size of the garden.
It does not take much to greatly increase the number of points you need to measure and graph. My current sketch has 11 garden bed points, 6 trees with the associated canopy diameter, 5 baby oak tree locations, house, porch step and sidewalk points. After I finalize the path shape, I will add location points for the center of the paths and sketch them in. Location of other details (water spigot, shrubs etc.) easily double these input numbers. So, I need to consider how much detail I need and how much time I have to create my map. I know that my final drawing will be helpful for years to come. I know that in my physical yard the two beds are much farther apart than they are on my rough sketch. I want to see how the proportion and spacing of the two beds looks when drawn to scale.

I plan to gather X,Y for:
House H1 H2
Porch P1, P2, P3, P4
Sidewalk S1, S2, S3, S4
Garden G1, G2, G3, G4, G5, G6, G7, G8, G9, G10, G11
Trees T1, T2, T3, T4, T5, T6
Baby Quercus Q1, Q2, Q3, Q4, Q5
If this looks like too much work, you may be able to map a smaller area or leave out detail.
My New Garden for 2023: For the entire new garden, I would need to remove the lawn and plant 940 square feet. This is more of a commitment in both time and money than I want to make in one year. I plan to do one third each year over the next 3 years. One third of 940 is 313 square feet. At approximately $6 a square foot my maximum budget is $1878. I estimate that 33 square feet will be path, so I need plants for (313 - 33 = 280) 280 square feet. I’m hoping I can spend less money because I can transplant some plants from the backyard, and I can use pollinator friendly annuals started from seeds. For 280 square feet I estimate that I need 140 plants but calculating for transplants and annuals, I’m going to order 100 plant plugs.
What I’m Behind On: We haven’t talked about the third dimension – “hills and valleys” or how they change water flow and plant selection. You’ll want to make note of high and low spots on your map and select plants accordingly.
My final plant selection list is not complete but here are some selections
- Prairie Smoke Geum triflorum is low and I’ll put some near the path (photo)

- White Wild Indigo Baptisia alba is a favorite but it gets taller than I want 4’- I’m thinking a group or three peaking above the rest of the garden would add interest.
- Cream Wild Indigo Baptisia bracteata struggles a bit in the back yard but it might do better with full sun - 2’ tall.
- I will get a few of these asters and see if the deer eat them.
- Aromatic Aster Symphyotrichum oblongifolium full sun 2’
- Silky Aster Symphyotrichum sericeum full part sun 12”
- I read that one of the Liatris - Liatris ligulistylis is deer resistant but it is 5’ tall. I’ll plant it near the house near an existing Switch Grass Panicum virgatum.
- Amethyst Shooting Star Dodecatheon amethystinum full part or shade 12” - I currently have it in part shade in the back yard. It is still there so the deer haven’t eaten all of it. This year I will try it in full sun.
- I will try a few of each of these spiderworts - I can move Ohio spiderwort from the back yard.
- Western Spiderwort Tradescantia occidentalis full sun 2’
- Ohio Spiderwort Tradescantia ohiensis full or part sun 3’
- Prairie Spiderwort Tradescantia bracteata full sun 1’
- Prairie Onion Allium stellatum full or part sun 14”
- Multiple Little bluestem Schizachyrium scoparium Planted so it is has backlight in the fall. I’m tempted to get cultivars which are 2’ rather than 3’ tall. Perhaps mixing Carousel and Smoke Signal. But the true native is lovely and well…. native.
I have annual salvia started from seeds in my basement and next week I’ll start Lilliput Zinnia and Mexican Sunflower which are all pollinator favorites. In my back vegetable garden, I run short of sunny, deer protected areas; so, I’ll plant basil and sage in the front yard. More plant decisions yet to come.
Garden Chores For This Month:
1. Before you dig you should have your utilities located. It’s good to know what is right below the surface of your new garden. This is especially true if you are planting a tree or bringing in heavy digging equipment. https://www.gopherstateonecall.org/. They recommend that you always call before you dig.
After you make arrangements with Gopher One, several people may come to your property, one person might mark the water line, someone else may mark the gas lines, etc. They will place color coded flags over the various buried utilities in the area you specify. You will need to wait the amount of time specified by Gopher One to make sure all the utilities have been marked at your house.
They will not locate private utilities. For example, a friend once cut a buried plastic gas line that went from the gas meter to an outdoor grill. Luckily, they could smell that something was wrong. The gas line had been installed by the previous homeowner and neither the new homeowner nor the utility company had a record of it. Another time, a friend cut a cable TV wire in half while outlining a new garden bed. The wire had been laid on top of the ground and then covered with sod. I don’t know if Gopher One would have known about it and marked that cable location.
2. I try not to walk on really wet soils because I may compact them. Having said that, I’ll admit I do walk around on my lawn to pick up sticks and watch for what is coming up. Pick up sticks from your lawn but don’t clean up last year’s native plant stems yet. You want to leave them until the insects nesting inside have emerged. More about that in May.
3. This info is for a garden style rather than for a prairie or meadow style garden - Cut back bunch grasses before the new leaves grow very long. This is the right time to cut back cool season grasses but because late spring is so full of other chores; I hand cut both cool and warm season bunch grasses in early to mid-April.
4. Creeping Charlie turns green right after the snow melts making it easy to spot and pull. In my wet sandy soil, it comes out with lots of its roots. It won’t solve the creeping Charlie issue but I feel triumphant when a long chain of creeping Charlie pulls out with roots intact.
Happy start to the 2023 gardening season!
Part 4- May Maps and Tips
In February, I covered questions to ask yourself before you start designing your new sunny native plant garden; how to calculate the cost in terms of time and money; how to start looking for native plants, and how to start sketching ideas for your garden. In March I covered options for mulch, edging, paths, plant selection and garden size. In April I covered the basics of creating a top down map of your garden and discussed how you can use maps to help design your new garden. It is very possible that with a smaller project, you did not need to create a map.
My Top Down Map: I decided to make a top down map of my front yard. When I started inputting points I discovered that I needed more points than I originally anticipated. I added points for the driveway and side yard trees; points for the front door, and the light pole. Of course it took longer than I anticipated because some of my measurements were not square or exactly accurate. I ended up measuring a number of things twice.
I drew my base map (house, garage, sidewalk, and existing trees) on a 11” x 17” graph paper. This allowed me to scale the drawing so that each grid line represented two feet. The 11” x 17” paper was too large for my home scanner / copier so I scanned and photocopied the base map at FedEx Office. I drew my new design on a photocopy of the original base map. Once I saw the new design drawn to scale; I made a few changes to the garden size and path shape. I wanted the front door of the house to have a clear view to the street and I wanted the entire design to feel balanced. I wanted to be able to reach most of the garden with only one step into the garden from either the lawn or a path. I wanted the path to let you look in various directions, to be winding but not create trip hazards.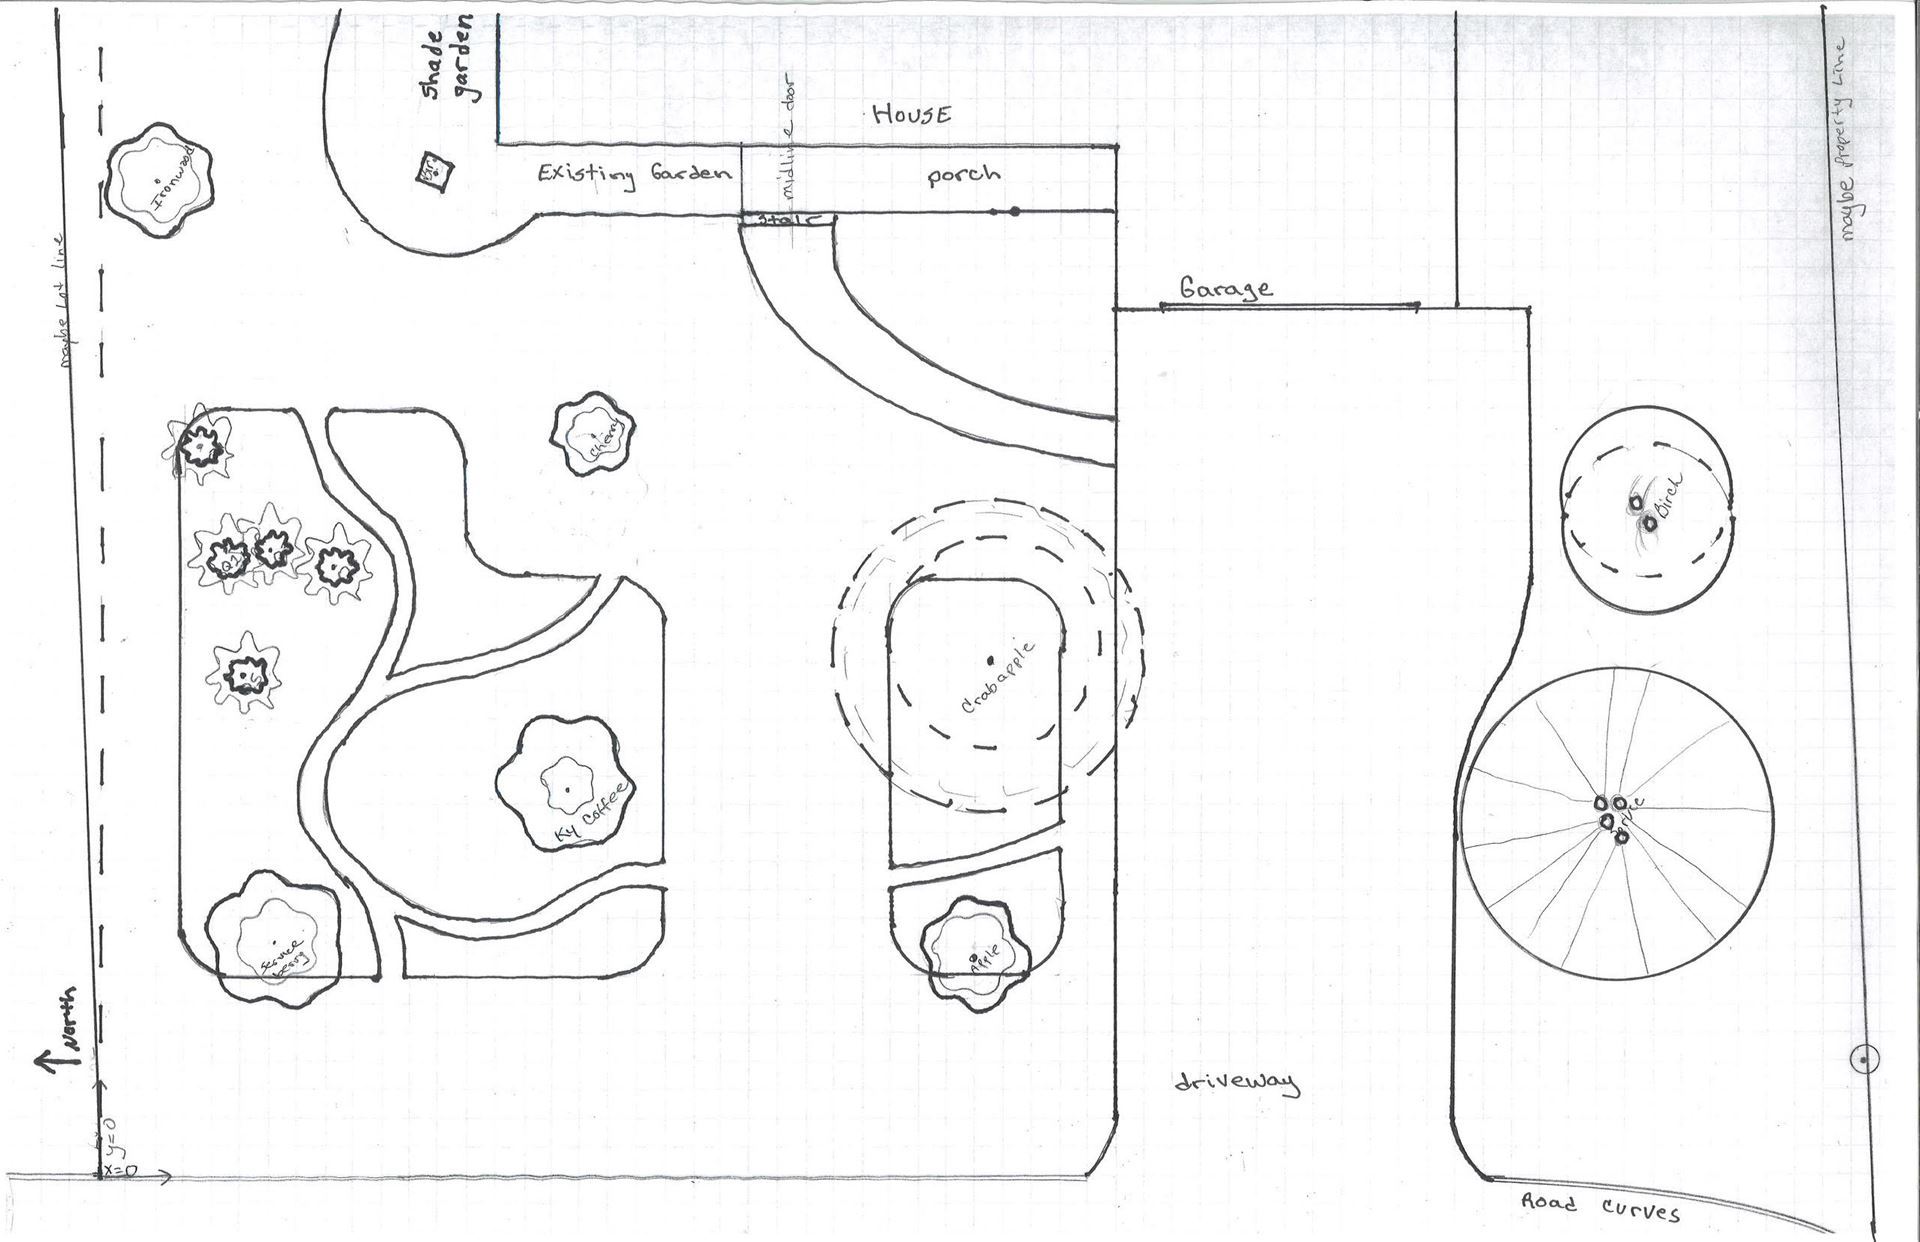
About 1/3 of this garden was planted in the past three years. From my design map drawn to scale, I was able to calculate the exact unplanted area by counting the graph squares. In the larger garden I have 544 square feet to plant and the smaller garden I have 312 feet left to plant.
Plants: Last month I decided to plant 280 square feet this year and I will stick to that number for now. When I went to order plants in late April, some of the selections, particularly the garden kits were sold out. I was able to place an order to be delivered to the May 20 Burnsville Native Plant Market. I did not order all the species but I did order 84 plants for a total (with taxes) of $215.00.
The species included:
- Thimbleweed (Anemone Virginiana),
- Whorled Milkweed (Asclepias verticillata),
- Midland Shooting Star (Dodecatheon meadia),
- Pale Purple Coneflower (Echinacea pallida),
- Prairie Smoke (Geum triflorum),
- Foxglove Beardtongue (Penstemon digitalis),
- Large-Flowered Beardtongue (Penstemon grandiflorus)
- Smooth Blue Aster (Symphyotrichum laeve),
- Aromatic Aster (Symphyotrichum oblongifolium),
- Sky Blue Aster (Symphyotrichum oolentangiense),
- June Grass (Koeleria macrantha).
I plan to move some plants from my backyard and purchase between 16 and 40 more plants this spring. I will be keeping my eye out for the following species. Some of these are shade tolerant, I will try them under the crabapple tree:
- Doll’s Eyes (Actaea pachypoda),
- Pasque Flower (Anemone patens),
- Prairie Pussytoes (Antennaria neglecta),
- Wild White Indigo (Baptisia alba),
- Cream White Indigo (Baptisia bracteata),
- Purple Prairie Clover (Dalea purpurea),
- White Prairie Clover (Dalea candida),
- Cream Gentian (Gentiana flavida),
- Prairie Allumroot (Heuchera richardsonii),
- Upland White Goldenrod (Oligoneuro album),
- Fragile Prickly Pear Cactus (Opuntia fragilis),
- Violet Wood Sorrel (Oxalis violacea),
- Prairie Spiderwort (Tradescantia bracteata),
- Long-Beaked Sedge (Carex sprengelii),
- Prairie Dropseed (Sporobolus heterolepis).
Removing your lawn: There are a number of ways to remove your lawn. Many of them are covered here . An internet search will also bring up video instructions.
Removing my lawn: I opted to use two methods to remove my lawn. On one section, I will remove my lawn by renting a manual sod cutter also known as a sod kicker. On a second section, I will use the sheet mulching technique with paper / cardboard. I will place the turf grass that I remove with the sod cutter on top of the paper / cardboard section. That way, I have a section that is ready to plant now and a section that will be ready to plant later. The paper will not blow away and the topsoil I removed with the sod cutter will not be wasted.
Getting Started: Before you dig, don’t forget that you should contact https://www.gopherstateonecall.org/ to have your underground utilities located.
I hope you feel ready to create your new sunny garden. You can follow my February, March, April and May blog to complete your: time and money budget; top down plan with bed design; plant list with vendors and locations; edging and mulch selection.
Planting: The plants should be planted at ground level never deeper.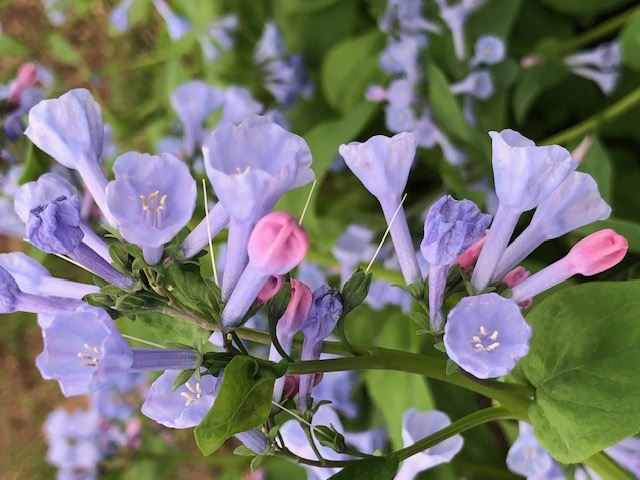 The mulch can be pulled away from the base of the plants if the plants are small. I recommend 1” to 2” of mulch. Be sure to keep the young plants watered because they do not yet have deep roots. Watch out for weeds. One of the advantages of planting a group of the same species together is that the planting pattern can help you tell your baby plants from your baby weeds.
Garden Chores:
- Now that the weather is consistently warm you can clean up your leaves and stems from last year. I let mine lay where they land or I move them to our compost pile.
- Plant your herbs and veggies
- Plant your annual seeds. For example I plant sunflowers, Mexican sunflower and zinnia for the butterflies. (And the people)
Good Luck!
Part 5- June Prep & Planting
Preparing the beds: Last month, I mentioned that I planned to remove 280 square feet of sod using a rented sod kicker. Things did not go as smoothly as I imagined; it was more difficult to kick the blade forward than it was 20 years ago. I felt it in my knees and hips. I removed over 100 square feet of sod in just over 2 hours. Over the next three weeks, I continued to remove sod a little at a time, with a shovel. I placed the sod on top of the layered paper to smoother the next section of lawn.
Plants: On May 20, I picked up my 84 pre-ordered plants at the Burnsville Native Plant Market. I also purchased 2 each of Meadow Blazing Star Liatris ligulistylis; Fringed Puccoon Lithospermum incisum; and Hoary Puccoon Lithospermum canescens. I placed all the plants in the shade of a tree and kept them watered.
Working a few hours a day, it took over two weeks to get everything planted. It was slow because I was removing lawn as I planted and I was spending time planting vegetables and weeding in other garden areas. After almost 3 weeks, all the plants look great with the exception of the whorled milkweed. I might have overwatered it or a critter gave it a taste test. I thought I was down to 5 out of 8 plants but now I see some of them are starting to regrow.
Planting: While laying out the new path through my existing bed, I needed to transplant about a dozen plants. Some of the plants were split in two others in to four. The transplanted pale purple coneflower Echinacea pallida and little bluestem Schizachyrium scoparium are not responding well to being transplanted. But, it has been hot so I will give them more time to rebound.
I lined the edge of the smaller bed with brick and got good feedback from neighbors and friends. I will probably continue edging with bricks but I am not sure when the edging will be completed. My friend who was going to rent a chipper shredder does not have time to do that now; so, I need to find an alternate source of mulch or plant cover. We have a very small chipper that chips branches up to about a one inch diameter. I used chips from that machine for the path but I don’t have enough small material to chip to finish all the paths and beds. Due to jumping worms, which I mentioned in an earlier blog, bringing dirt or mulch into our yard makes me very nervous. I have not yet decided on a solution. The downside to not putting mulch down right away is weeds. Hoeing can take care of a good portion of the weeds but that is only a temporary solution.

New bed in the foreground. Smothering sod with paper weighted down with sod pieces in the background.
Costs:
Plants $215.00 plus $48
Sod kicker rental $25
Bricks
Plastic pots: Now that the plants are in, I have a pile of plastic pots. I can wash and sterilize them to use next year or I can recycle them. According to the company websites, both Home Depot and Lowe’s recycle plastic pots. I took mine to the Bloomington Home Depot on American Blvd. actual address is 400 West 79th street. I drove around the Garden side of the building and the recycling location was not obvious. I was told to leave my pots on the empty racks on the side of the building. As more people leave pots to be recycled, the location should become more obvious.
Garden Chores for June and July:
1. Weed
2. Water
3. Mulch or plant ground cover plants
4. Recycle pots
5. Add additional plants; as needed, as an experiment, or just for fun
Wishing everyone a great gardening summer!
Part 6- October - Summer Recap and Fall Plan
Drought: We had a hot dry summer and before the recent rain, parts of my garden were showing the impacts of drought. I spent many early mornings watering my new plantings in the front yard, my existing plantings in the backyard, the young trees, my raised vegetable garden, and my patio annuals. After several years of summer drought, I’ve had a number of species dry up or simply disappear. Species that I did not see this summer include Obedient Plant (Physostegia virginiana); and Great Blue Lobelia (Lobelia siphilitica).
I’ve decided not to replace species that do not thrive without consistent watering. I may move some of the drought stressed species to one area that I can easily water during times of low rainfall. Moving forward, I plan to make sure the plants I purchase can thrive in medium-dry soils.
Hardscape and Paths: I have not completed any of the paths due to two factors. First, July and August were too hot to transplant the plants that are in the way of the future path. Second, my source for wood chips did not work out and I hesitate to purchase wood chips that might have jumping worm eggs. When it cools down, I will transplant the plants that are in the pathway and lay bricks along the edges. I hope I will have wood chips from my own yard in the near future.
Lawn Removal and Weeds: In the areas where I dug up lawn, planted natives and then added wood chips; I needed to do only minor weeding. In areas where I did not add wood chips or mulch, I had a great crop of crabgrass which was fairly easy to pull when the plants were young. It has not returned a second time.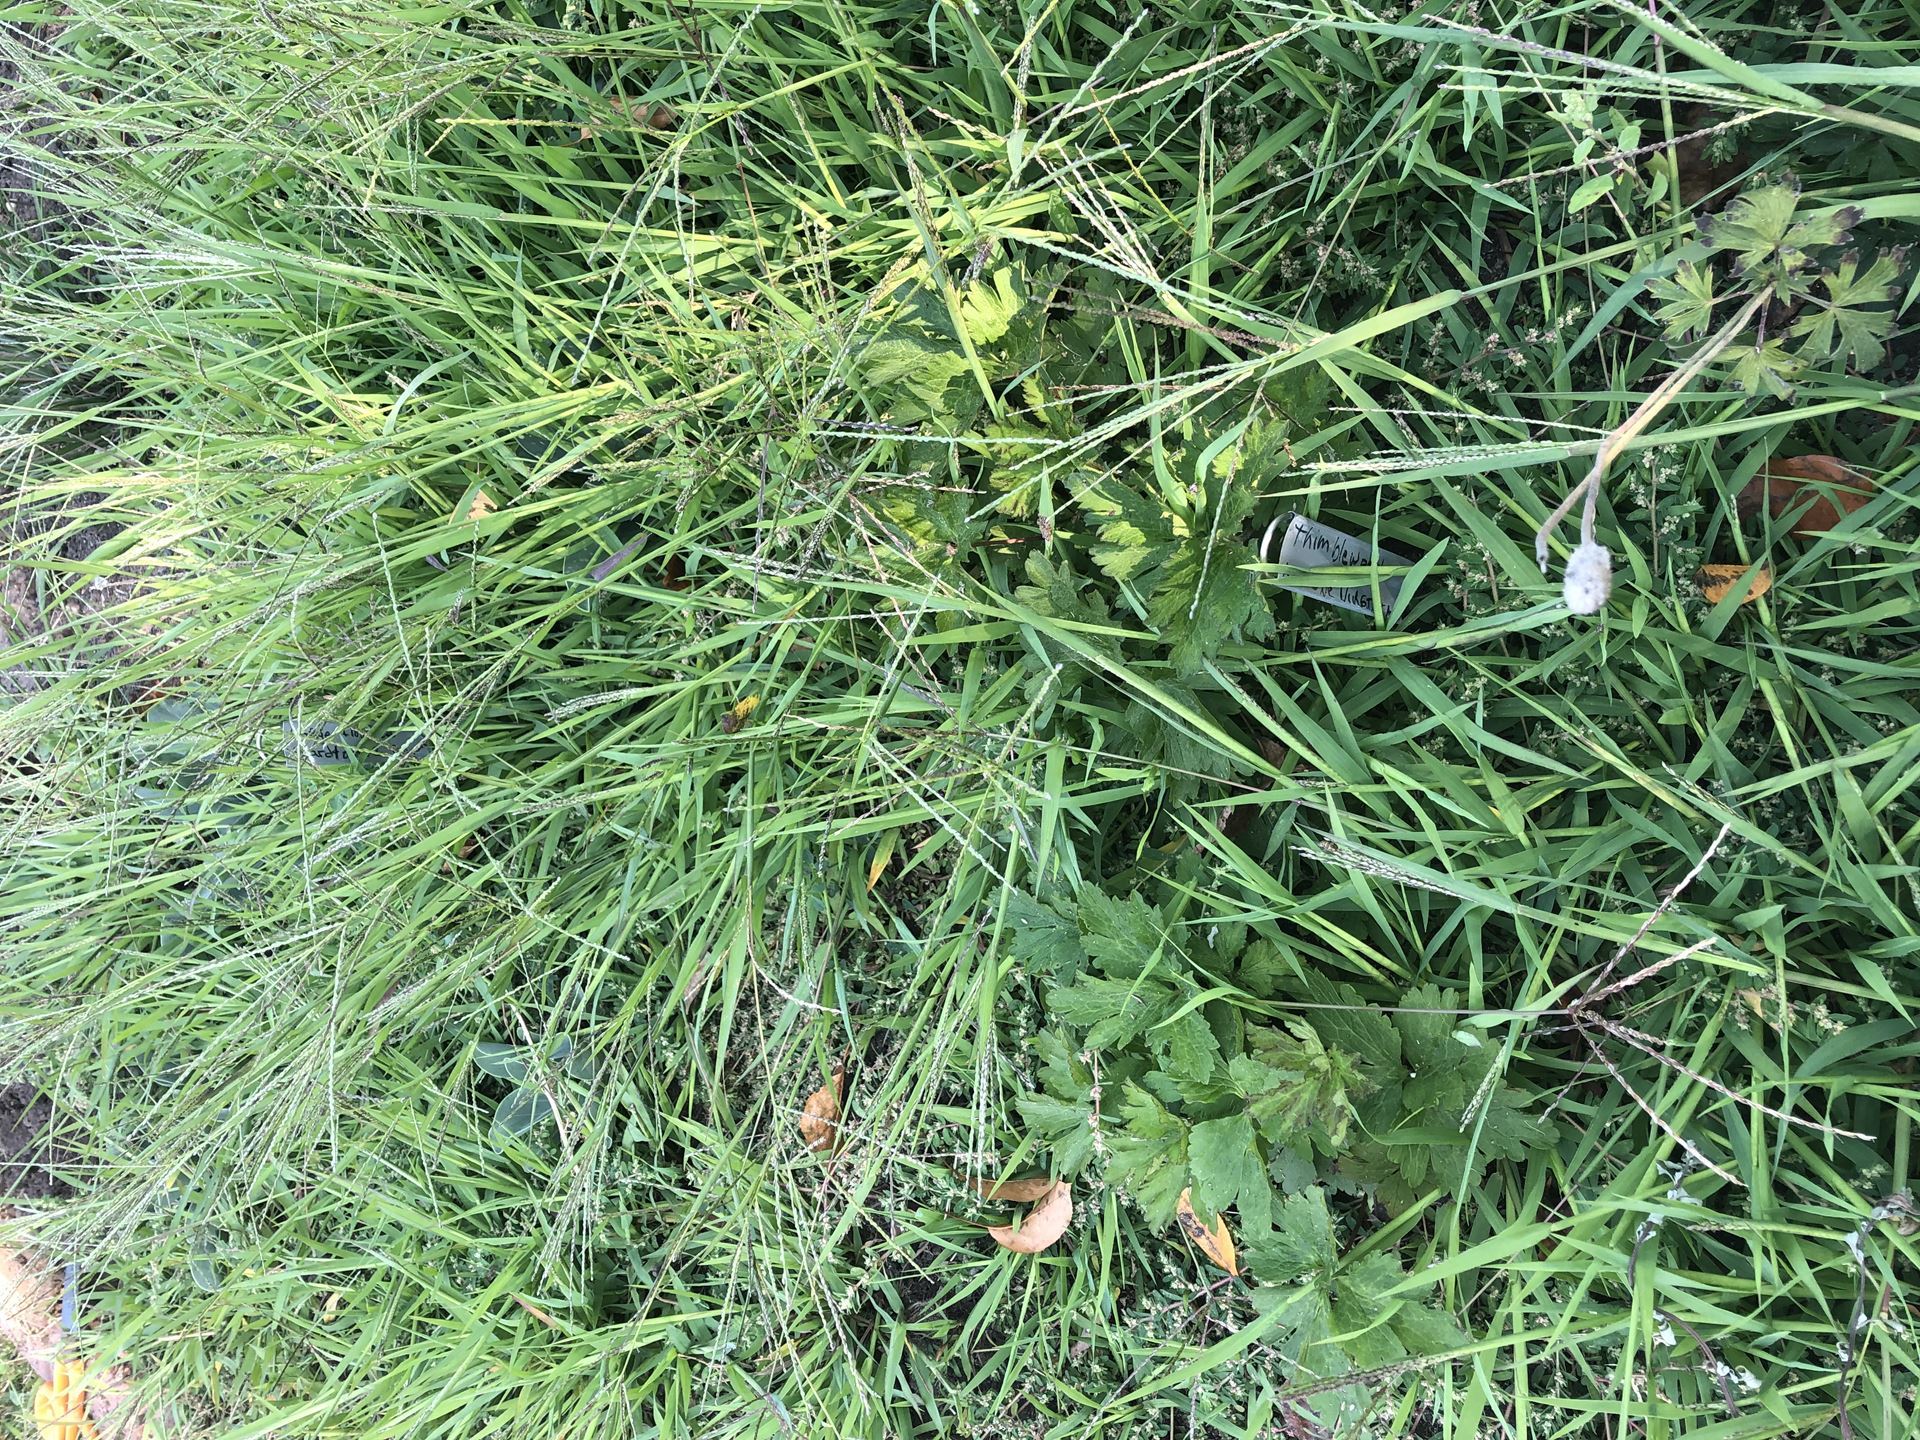
In areas where I piled the lawn turf on top of paper, I had two very different results. Where the removed lawn was healthy and without crabgrass, the clumps have dried up and can now be composted or incorporated back into the soil. The lawn clumps that contained crabgrass have developed into a thick crop of crabgrass that is difficult to pull from the clumps. Now unfortunately, I have crabgrass going to seed. I can’t mow over the clumps and remove the seed heads because the surface is too uneven. The idea of removing lawn from one area to hold down the paper (to smother a second area), only works if you have a healthy lawn (no crabgrass or weeds) to start with.
Trees and Shrubs: I have been watering the trees all summer and most are doing well. I lost most of the leaves on my pagoda dogwood (Cornus alternifolia) but after the recent rain it is looking better. I have been less attentive to the shrubs and several became stressed and they lost leaves early. This fall and possibly next summer, I will focus on watering the shrubs when I water the trees.
I now have native tree seedlings that need to be either transplanted or removed. The native seedlings include green ash, hackberry, sugar maple, silver maple, red oak, bur oak, black walnut and cottonwood. I also have non-native and invasive species like white mulberry, and Norway maple which I will remove. With such a great crop of seedlings, I do not plan to purchase any trees in the near future. I may replace some of my non-native shrubs (cotoneaster, lilac, spirea) with natives.
New Plantings: So far, I’ve had a 95% success rate with the native plugs I purchased this spring. The only plants that I lost were 3 whorled milkweed. Everything else looks good. The whorled milkweed plants that did survive bloomed and now have seed pods on them. All three aster species are either blooming or are about to bloom. I expect everything else to bloom next year.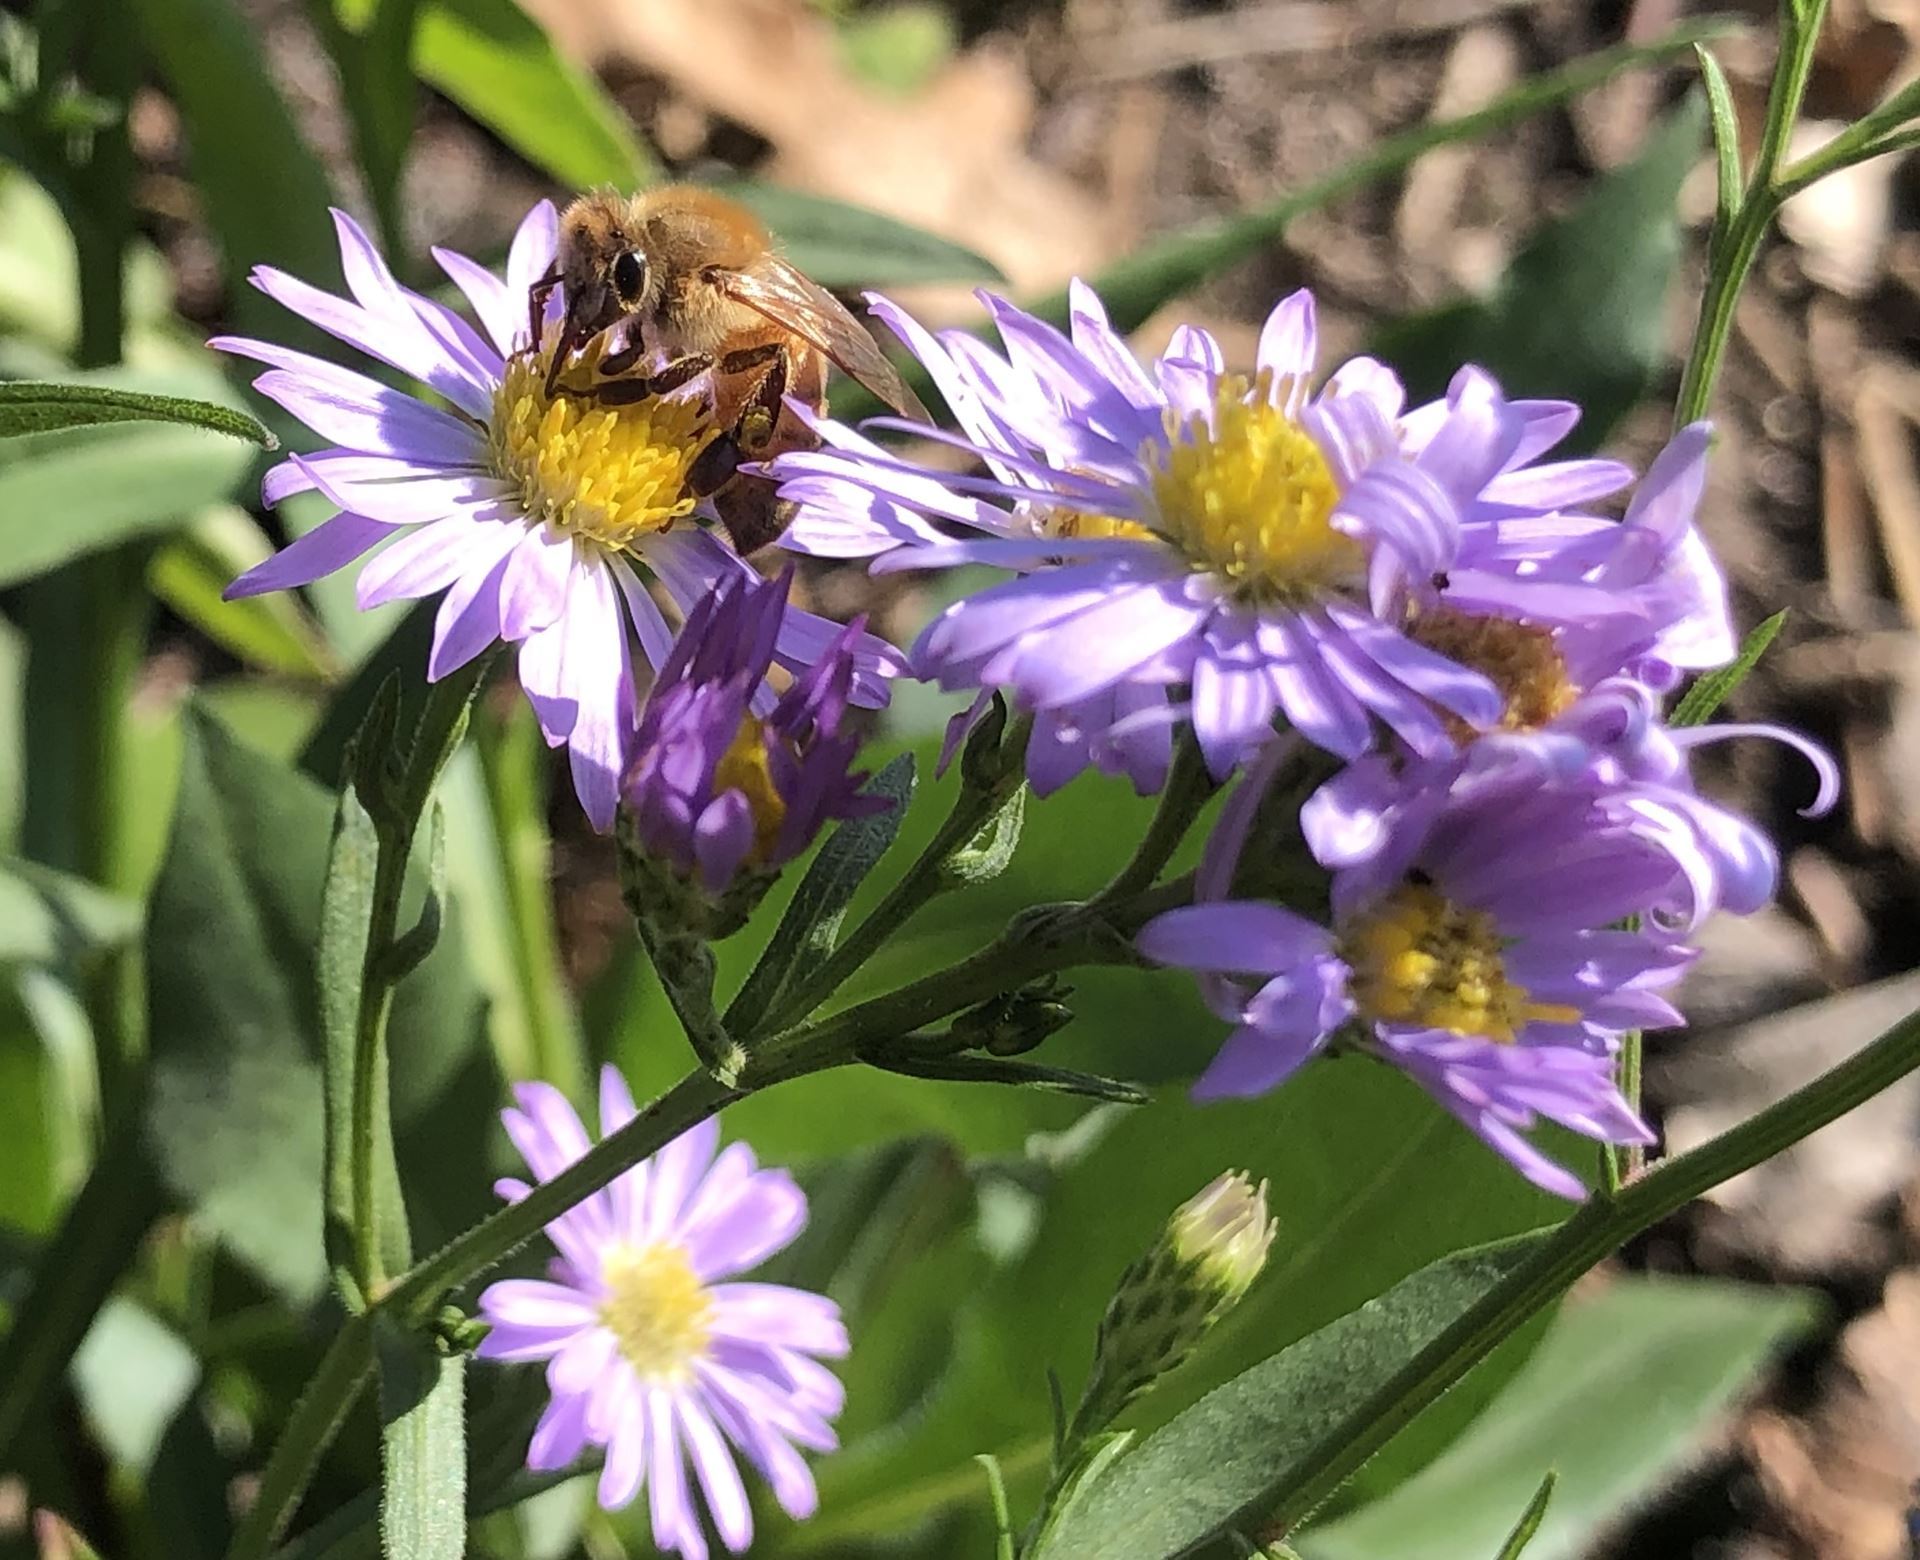
Deadheading: I still need to deadhead species that spread excessively. I will leave the stems and foliage intact until the insect emerge late next May or early June.
My Actions for this fall
1. Decide location and shape of the “water more frequently area”.
2. Take note of which plants need to be moved to the area that I will water more frequently.
3. Transplant plants.
4. Purchase and lay brick on the edge of walkways
5. Water shrubs when I water trees.
6. Transplant or remove tree seedlings.
7. Weed.
8. Deadhead plants that reseed excessively. In my yard, that would include: Prairie Coreopsis (Coreopsis palmata); Canada Goldenrod (Solidago canadensis); and Big-leaved Aster (Eurybia macrophylla).